Most people assume bark is a smoker’s game. You need the wood, the smoke, the twelve-hour vigil, the offset smoker sitting in the backyard — and without all of that, you’re just making pot roast. Good pot roast, maybe, but not brisket with a real crust.
That assumption is understandable, but it’s wrong. Smoke adds flavor. It does not create bark. The dark, firm, almost jerky-like crust on a great brisket is the result of heat, time, and surface chemistry — none of which require a smoker to achieve. An oven can do every structural thing a smoker does. It just can’t add the flavor of wood smoke, and that’s a separate problem with a separate fix.
What follows is everything you need to build a real bark on a brisket using nothing but a standard oven, a wire rack, and some patience.
What bark actually is — and what makes it form
Bark is the result of two processes happening simultaneously on the surface of the meat.
- The first is the Maillard reaction — the same browning process that creates a crust on a seared steak or a roasted chicken. When proteins and sugars on the surface of the meat are exposed to sustained dry heat, they break down and recombine into hundreds of new flavor compounds, turning the surface dark and deeply savory in the process.
- The second is moisture evaporation. As the surface of the brisket loses moisture, it dries out and concentrates. The rub particles, which started out as a coating, gradually become part of the crust itself — bonding with the proteins as they denature, forming a cohesive shell rather than a powder you can brush off.
Neither of these requires smoke. What they require is dry surface heat sustained over enough time for the crust to build gradually. Smoke contributes flavor during this process, but it isn’t load-bearing — take it out of the equation and the Maillard reaction still happens, the moisture still evaporates, the crust still forms.
The enemy of bark isn’t a lack of smoke. It’s trapped moisture. A tightly sealed roasting pan, a foil tent pressed down against the meat, a brisket that was wet on the surface when it went in — any of these will cause the surface to steam rather than crust. Steam is great for tenderness and catastrophic for bark.
This is why most oven brisket recipes produce a grey, soft exterior. They tell you to cover the pan tightly and braise low and slow — which is absolutely correct for getting a tender result, but it’s the direct opposite of what bark requires. Braising and bark are in tension. The strategy for doing both is not to choose between them, but to sequence them: braise first to build tenderness, then uncover to build the crust.
The rub: where bark actually begins
Bark starts before the oven. What you put on the surface of the brisket determines what the crust is made of — and if the rub is wrong, no amount of oven technique will fix it.
The foundation of a bark-building rub is coarse black pepper and coarse kosher salt in roughly equal parts. This is the central Texas brisket standard, and it works for a specific reason: coarse particles create surface texture. Fine powders cake and smooth out; coarse particles sit on the surface, create irregular topography, and give the crust something to build around as moisture evaporates and proteins bond. Don’t use fine-ground pepper or table salt here — the coarseness isn’t optional.
From that foundation, you can add garlic powder, onion powder, and smoked paprika without any concern. Smoked paprika does double duty — it adds color and a subtle background smokiness that becomes useful later. Chipotle powder adds both smokiness and a gentle heat that works well with the richness of brisket fat.
Sugar is more complicated. It contributes to surface color and caramelization, but it burns before bark fully forms at low oven temperatures. A small amount — a teaspoon or two for a full packer brisket — is fine. More than that and you risk the surface going dark for the wrong reasons, or worse, getting a bitter, scorched exterior in the uncovered phase.
The question of wet rubs and binders comes up often. A thin smear of yellow mustard before the rub is applied is completely fine — it helps the rub adhere and cooks off during the long cook without adding meaningful moisture. The emphasis is on thin. A thick mustard coating introduces surface moisture that has to evaporate before crust can form, and at 250°F that evaporation takes a long time. Same principle applies to any wet binder: the thinner the layer, the less it works against you.
Once the rub is applied, put the brisket uncovered in the refrigerator for at least an hour, and ideally overnight. This step does two things. It dries the surface — the cold air in the fridge draws moisture out of the meat, which is exactly what you want going into the oven. And it gives the rub time to adhere properly, so it becomes part of the surface rather than sitting loosely on top of it. When the brisket comes out of the fridge and goes into the oven, the rub should look dry and set. If it looks wet or shiny, give it more time.
Fat cap management
The fat cap on a brisket — the thick layer of hard white fat on one side — is both an asset and an obstacle, and understanding how to handle it changes the result significantly.
A full, untrimmed fat cap insulates the meat from direct heat. On the fat-cap side, this means bark won’t form — the fat acts as a buffer between the oven’s heat and the meat’s surface. This is fine, because the fat cap side isn’t where you want bark anyway. The bark that matters forms on the exposed meat surfaces: the sides, the top if you’re cooking fat-cap-down, the ends.
The right trim is about a quarter inch of fat remaining. Thick enough to self-baste the meat as it renders during the long cook, thin enough not to act as a full insulating barrier. If you leave an inch of fat on, the meat underneath never sees real heat. If you trim to nothing, you lose the self-basting effect and risk the surface drying out too aggressively.
Score the fat cap lightly in a crosshatch pattern before applying the rub. This does two things: it lets the rub reach the thin layer of meat beneath in places, and it gives the rendering fat somewhere to go as it liquefies, rather than pooling and steaming the surface. Use a sharp knife and cut just deep enough to break the surface of the fat without going into the meat.
Cook fat-cap-up throughout. As the fat renders, it runs down the sides of the brisket, basting the meat surfaces continuously. This keeps the interior moist during the long covered cook without adding surface moisture that would inhibit bark during the uncovered phase.
The oven method: two phases, one brisket
The method that makes oven bark possible is a two-phase cook — a long covered period for tenderness followed by an uncovered period that builds the crust. Neither phase alone gets you what you want. Together, they do.
Phase one — the covered cook
Set the oven to 250–275°F. Place the brisket fat-cap-up in a roasting pan, cover it tightly with foil or a lid, and leave it alone. This is the braise phase. Moisture stays in the pan, the connective tissue breaks down slowly, and after six to eight hours depending on the size of the brisket, the meat will be tender all the way through.
Don’t be tempted to uncover early to check on bark formation. At this stage there will be no bark — there’s not supposed to be. The surface at the end of the covered cook will be grey and soft and wet-looking, which is exactly right. You’ve built tenderness. The crust comes next.
The covered cook is complete when the brisket reaches an internal temperature of around 195–200°F and a probe or skewer meets almost no resistance going in — it should feel like pushing into room-temperature butter. If there’s any resistance, give it more time. Bark cannot save undercooked brisket, and the uncovered phase isn’t long enough to finish cooking the interior if the covered phase was cut short.
Phase two — the uncovered finish
This is where bark is built.
Remove the foil or lid. Transfer the brisket to a wire rack set over a roasting pan — if you’ve been cooking in a deep roasting pan with liquid in the bottom, the wire rack is essential at this stage. The meat needs to be elevated above any liquid so the steam dissipates rather than bathing the surface.
Raise the oven temperature to 300–325°F. This slightly higher heat accelerates crust formation without overcooking the already-tender interior.
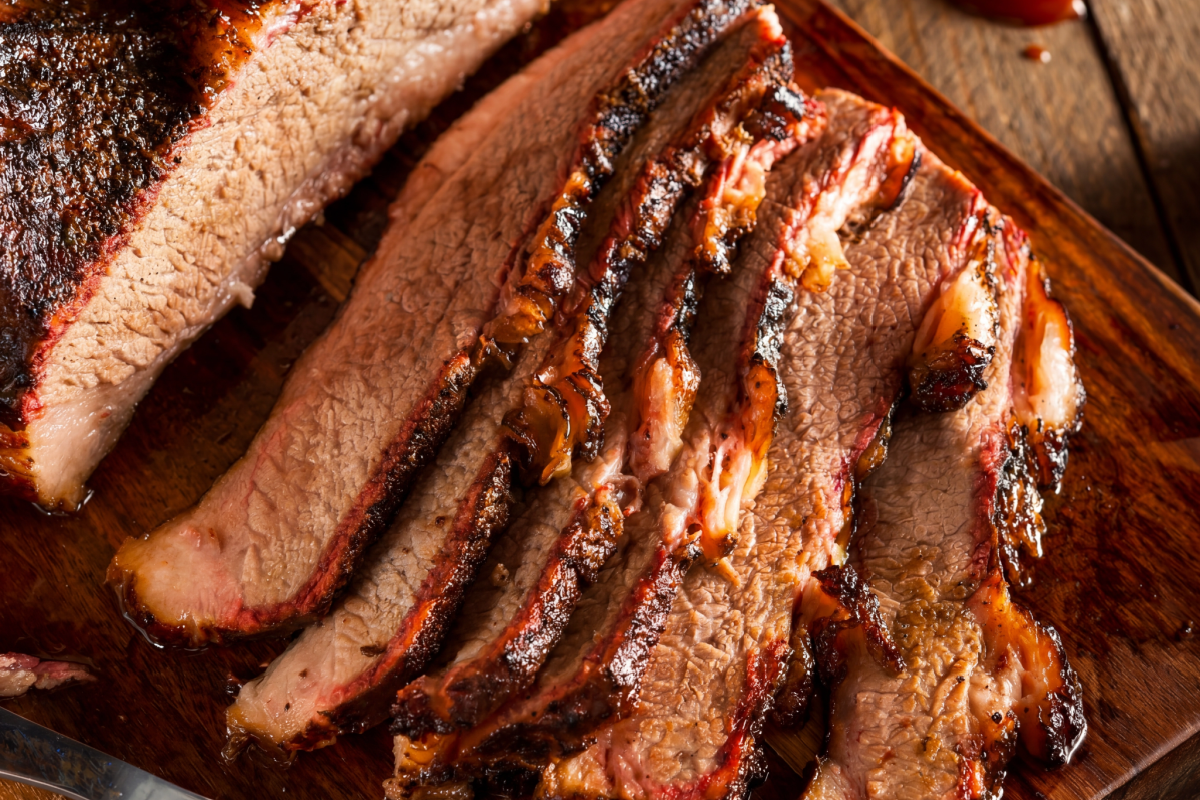
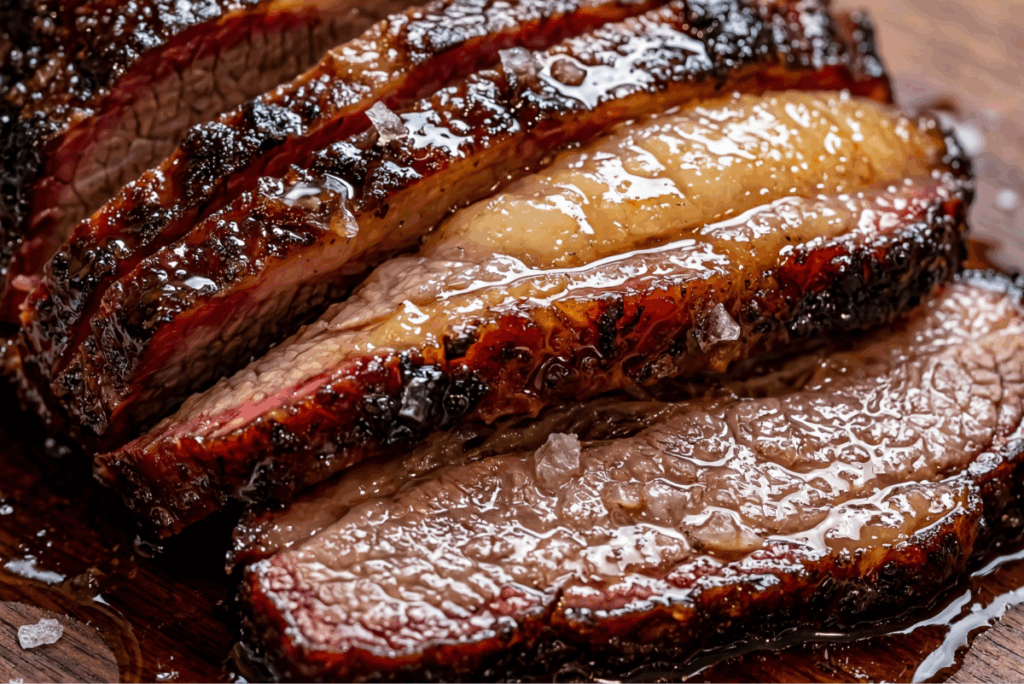
Leave it uncovered and undisturbed for 90 minutes to two hours. During this time the surface — which started wet and grey from steaming — will gradually dry out, darken, and firm up. What you’re watching for is a surface that has gone from grey to brown to a deep, almost mahogany color, with a texture you can press against and feel resistance. That resistance is bark.
Resist the urge to baste during the uncovered phase. Every time you add moisture to the surface, you reset the evaporation process and delay crust formation. The fat cap is basting from above — let it do its job.
If the surface is darkening faster than you’d like before the crust has fully firmed up, lay a piece of foil loosely over the top — not pressed down, not sealed at the edges, just resting on the surface. This slows the color development without trapping steam.
Managing moisture during the uncovered phase
The brisket will release significant liquid during the uncovered phase. This is normal — the meat is still giving up moisture — but the steam from that liquid can slow bark formation if it’s not managed.
The wire rack solves most of this. Elevating the meat keeps it out of its own liquid and allows airflow underneath, which helps the surface dry evenly. If you don’t have a wire rack, crumple a sheet of foil into rough ridges in the bottom of the pan and rest the brisket on that — imperfect, but better than sitting directly in liquid.
Keep the oven door closed. Opening it repeatedly releases heat and introduces humidity. Check once at the halfway point of the uncovered phase — after about 45 minutes — to assess the surface color and decide whether you need to adjust. After that, trust the oven.
If the roasting pan is accumulating a lot of liquid, carefully pour some off. You want a small amount in the pan to prevent burning and to add humidity to the oven environment, but a deep pool of liquid generates too much steam.
Smoke flavor without a smoker
Bark and smoke flavor are two different things, and this method gives you one without the other. For many people that’s completely fine — a well-built bark has so much flavor of its own that smoke becomes secondary. But if you want to close the gap, there are a few approaches that genuinely work.
Smoked paprika in the rub is the baseline — it’s already in there, and it adds a real background smokiness that deepens during the long cook.
Smoked salt swapped in for regular kosher salt in the rub adds a more pronounced wood-smoke note. It’s subtle, but it’s there.
Liquid smoke, used sparingly, is more effective than its reputation suggests. A few drops added directly to the rub and worked in, or brushed onto the surface at the start of the uncovered phase, adds genuine smokiness without tasting artificial. The key is a few drops — a teaspoon is too much, and it will taste like you poured a bottle of smoke over the meat.
The honest version of this: none of these replicate what twelve hours in an offset smoker does. The smoke flavor from a smoker penetrates the meat, colors the interior pink, and adds a complexity that comes from actual combustion. These methods approximate it from the outside in. The brisket you get from this oven method — with a real bark, properly built — is excellent on its own terms. It’s not a consolation prize. It’s just a different thing.
The rest — don’t skip it
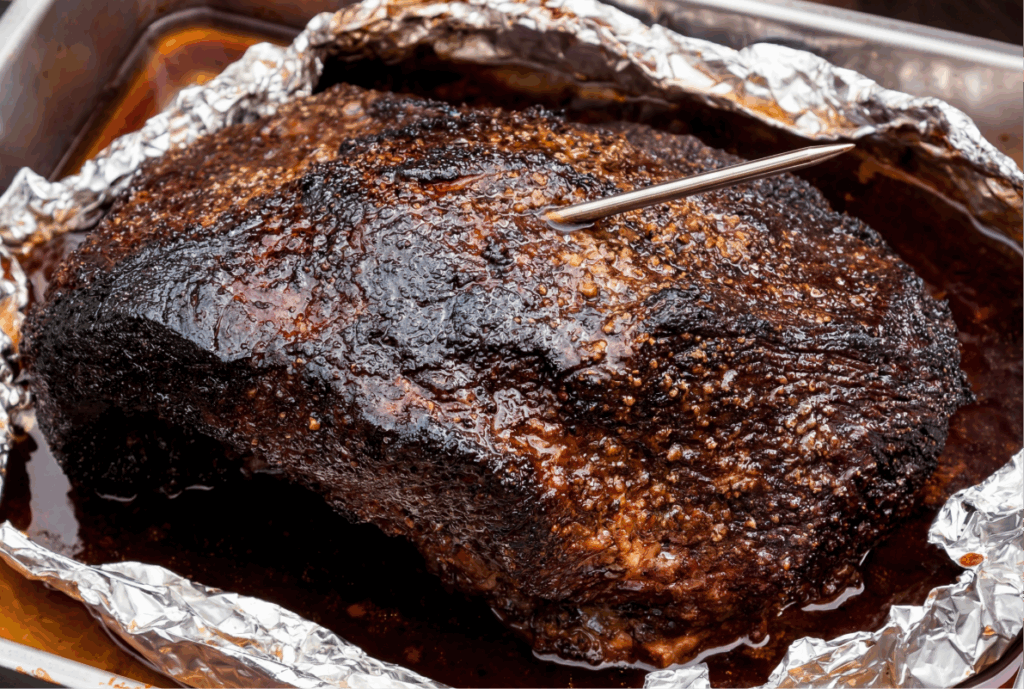
When the brisket comes out of the oven, the bark will look almost alarmingly dark. This is correct. It will also be slightly soft from the residual heat — the crust firms up as it cools.
Rest the brisket for a minimum of 30 minutes and ideally a full hour before slicing. During the rest, the juices redistribute through the meat and the crust continues to set. If you cut into it immediately, two things happen: the juices flood the surface and soften the bark you just spent hours building, and the interior is hotter than it should be for slicing, giving you ragged rather than clean cuts.
Rest it loosely tented with foil — not wrapped tight, which traps steam and softens the crust, but a loose tent that holds some heat while allowing air to circulate. After an hour, what came out of the oven looking almost burnt will have settled into a deep, firm, mahogany crust with a texture that snaps slightly when you press it. That’s what you were after.
Slice against the grain. The bark on each slice should be visible as a dark band around the edge of the meat — distinct from the interior, firm in texture, and deeply seasoned. If it’s crumbling or soft, the uncovered phase needed more time or the rest was cut short. If it’s there and it’s holding, you did it right.
Putting it together
Oven bark comes down to three decisions made in the right order. Start with a coarse dry rub on a properly prepped, well-dried surface — this is where the crust is built from. Cook covered at low heat until the meat is completely tender — this is the braise phase, and cutting it short undermines everything that comes after. Then uncover, raise the temperature slightly, get the brisket on a wire rack, and leave it alone long enough for the surface to transform from grey and wet to dark and firm.
No smoker required. No special equipment beyond a wire rack. Just a method that works with the oven’s strengths instead of apologizing for its limitations.
For the full recipe that uses this technique, Millie’s oven brisket is the place to start — the rub ratios, timing, and temperatures are all worked out. Once you understand what the method is trying to do, the recipe becomes a lot easier to follow.
Need a few suggestions on what to serve with this masterpiece? A cool and crisp classic wedge salad would be delicious and roasted garlic mashed potatoes would complete a perfect meal. Then, continue the Texas-themed dinner with a healthy serving of a chocolatey Texas sheet cake with fudgy icing.
PrintPERFECT OVEN ROASTED BEEF BRISKET
Rubbed with a savory, peppery, dry rub and roasted low and slow, this brisket recipe is brilliant in its simplicity.
- Prep Time: 10 minutes
- Marinating: 6 hours-12 hours
- Cook Time: 4.5 hours
- Total Time: 10 hours, 40 minutes
- Yield: 14 servings 1x
- Category: Main Dish – Beef
- Method: Roast
- Cuisine: American
Ingredients
- 2 tablespoons kosher salt
- 2 tablespoons black pepper
- 2 tablespoons brown sugar
- 1 tablespoon chili powder
- 1 tablespoon paprika (if you like the smokey flavor, use smoked paprika)
- 1 tablespoon dry mustard
- 1 tablespoon garlic powder
- 1 tablespoon onion powder
- 6–7 pound beef brisket with a fat cap of at least ¼ inch
Instructions
- In a small bowl, combine all of the spices, salt, pepper, and brown sugar. Stir to combine.
- Remove the brisket from its packaging. Using your hands, rub water all over the brisket to dampen the meat.
- Rub the spice rub mixture over all sides of the brisket. Be sure to get the sides. Gently pat the rub into the meat. Wrap tightly in foil and refrigerate overnight for the best ‘bark’.
- When ready to roast, preheat your oven to 275 degrees. Remove the brisket from the refrigerator and allow to sit on your counter for at least 30 minutes to come up to room temperature.
- Lay the meat, fat side up, in a large roasting pan. The roasting pan should be at least 3-inches deep and large enough that none of the meat touches the sides of the pan.
- Cover the pan tightly with foil. Roast in the preheated oven for 4 ½ – 5 hours or until the internal temperature of the thickest part of the brisket reaches 180 degrees. Baste the brisket with pan drippings every 30 minutes.
- Uncover the pan and continue to roast the brisket for 1 ½ – 2 hours or until the temperature of the thickest part reaches 200 degrees.
- Remove the pan from the oven.
- Using large meat forks, carefully lift the meat from the pan and place onto a plastic wrap lined cutting board. Wrap the hot meat entirely in plastic wrap and then wrap the plastic wrapped brisket in newspaper, butcher paper or kitchen towels.
- Place the wrapped brisket in an insulated ice chest, a large toaster oven, or a microwave. You want to preserve as much heat as possible, while allowing the meat to rest for one hour.
- After one hour, unwrap the brisket and place on a cutting board. Using a sharp knife, cut the meat, diagonally, against the grain into thin slices.
- Serve warm.
Nutrition
- Serving Size: 1